
Creating a new replication record or editing an existing replication record invokes the same tabbed dialog and functionality.
Destination Tab
If the replication record has more than one target server, then the order in the Selected Servers list box is important. CommonSpot replicates to servers in top-down order. As soon as a second server is added to the Selected Servers list, the following controls display. Use them to specify whether packets are applied simultaneously or sequentially to each target.
If the first option is selected, the authoring server signals each selected target server to begin replication once each server is sent a replication packet. The second option staggers application of replication packets. This is can be helpful when replicating large packets that may strain system resources. Staggering replication activity ensures that not all servers are dealing with a potentially demanding task at the same time.
Frequency Tab
The Frequency Tab allows the administrator to choose the how often replication runs for this record. There are three options.
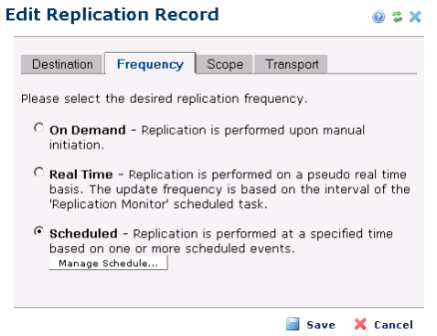
On-Demand – On-demand replications are manually initiated by an administrator by clicking the go icon next to the replication record in the Replication Records dialog.
Real Time – The Real Time replication option signifies a "semi-real time" replication schedule. The schedule is controlled by how often the replication background process runs. By default it is configured to run every two minutes. When the background process runs, it checks to see if there have been any changes that need to be replicated. If so then the replication process is initialized - thus the ‘semi-real time nature. It is important to note that if the replication record is configured to scan directories for changes, then this process might be expensive in terms of processor resources. As such you can adjust the increment in how often the CommonSpot Replication Monitor process runs to best meet your needs.
Scheduled – The Scheduled option allows the administrator to run the replication on a certain schedule. For example every x hours, or at given time(s) during the day. If selected, click the ‘Manage Schedule…’ button to invoke the Manage Schedule dialog. For more information on this dialog and its settings, see the Manage Schedule Dialog section. Also see the Knowledge Base article at http://www.paperthin.com/support/knowledgebase/articles/How_to_Schedule_Replication_Records.cfm
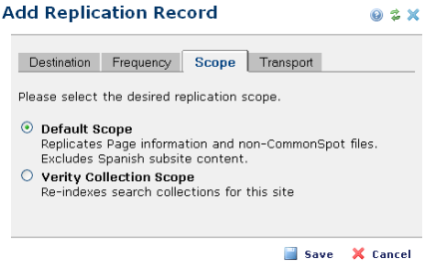
Scope Tab
The Scope Tab displays the list of scopes registered through the Replication Scopes dialog. to be used during the replication. The list of registered scopes is presented as a list of radio button options. By default the Default Scope option is selected.
Transport Tab
Use the Transport tab to select the transportation protocol for replicating packets between the Authoring Server and each target server designated on the Destination Tab.
CommonSpot provides five protocol options for transporting packets: FTP, including secure FTP, direct connect over UNC (or a mount point under UNIX servers), HTTP (supported but not recommended), and Manual (“sneaker-net”) transportation.
HTTP is supported but not recommend as it often fails for larger packets and is much slower.

FTP, Secure FTP, or UNC is recommended based on your network configuration. In order to use the UNC Transport Method both Author and ROPS must be on the same network. The Author server ColdFusion Service must have access to the ROPS file system using a Domain user to run the ColdFusion Services. Otherwise FTP must be used.
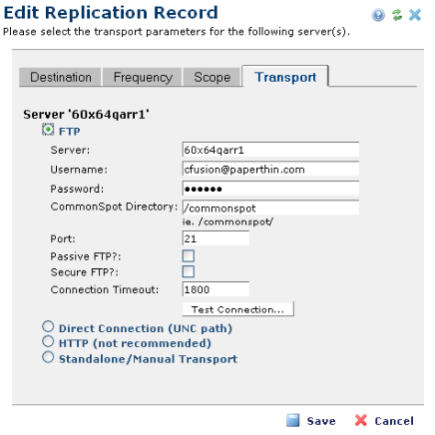
To transport replication packets via FTP, enter the target server name, the user name and password required to open a connection, and the replication directory, as shown above. Optionally select Passive FTP to establish all connections (to route through a firewall, for example) or Secure FTP. Passive FTP can slow down the connection process. For secure connections, the command FTP port is typically port 22.
Set a Connection Timeout period in seconds. If no data is sent within the specified timeout period, the connection closes and CommonSpot will try to reconnect.
Click the Test Connection button to verify your configuration setting.
For configurations running Unix or Linux servers a mount point can be used in place of a UNC connection. Simply specify the mount point to the CommonSpot directory as shown below.

For each target server specified on the first tab, you will see a section on this tab, as shown below.

Selecting a protocol option prompts for protocol-specific fields. Use the Test Connections button to test connectivity using the selected protocol and parameters. For more information on the Test Connections dialog, please refer to the Test Connections Dialog section.
If the Transport tab is blank, select a destination server on the first tab.
Related Links
You can download PDF versions of the Content Contributor's, Administrator's, and Elements Reference documents from the support section of paperthin.com (requires login).
For technical support:
