

|
SARATOGA National Historical Park |
 |
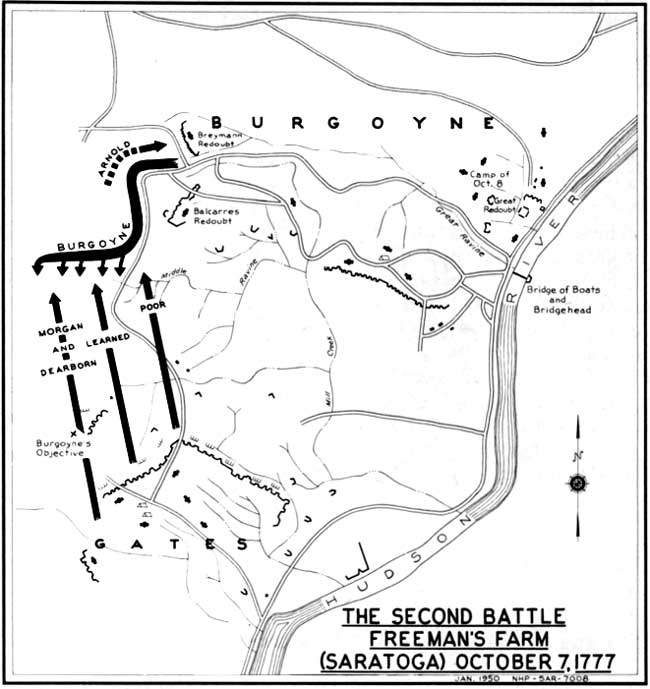
The Second Battle at Freeman's Farm.
(click on window for an enlargement in a new window)
The Battle of October 7
Confident and self-assured as a result of their first encounter, the American troops grew restive as they impatiently awaited a further attack. Despite drenching rains, chill nights, inadequate supplies, and scanty rations, these ragged troops, who held the destiny of a nation in their hands, could still find heart to make merry at night. So exuberant was their revelry, in fact, that the sentries complained that because of the noise they could not hear the British and would find it impossible to warn their comrades if they did. In order to correct this condition, Gates had to issue an early curfew order.
Nearly 3 weeks of futile waiting brought Burgoyne no aid from either Howe or Clinton. On October 6, however, unknown to Burgoyne, Clinton did succeed in capturing the forts along the highlands of the Hudson (he reached as far north as Esopus [Kingston] on October 16).
With the strength of his opponent greatly increased by the arrival of 4,000 militia reinforcements so that he was outnumbered now two to one, and, with his supplies rapidly diminishing, Burgoyne's position became a desperate one necessitating either an advance or a retreat. After some hesitation, he decided to risk everything on a second battle.
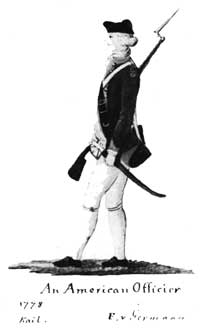 Uniform of an American officer, regiment unknown: black hat, brown coat, red facings, red and white waistcoat, red epaulette, buff breeches, white stockings. |
 Uniform of an American soldier, regiment unknown: black hat with brown brush, gray coat with yellow facings, red-brown breeches, and light blue stockings. |
Accordingly, on the morning of October 7, Burgoyne ordered a reconnaissance in force to determine the nature of the ground and the advisability of a thrust at the American left. With 1,500 picked men led by Generals Fraser, Riedesel, and Phillips, and supported by two 12-pounders, six 6-pounders, and two howitzers, Burgoyne moved out from camp about 12 o'clock and advanced toward the American left. After moving in a southwesterly direction for a distance of approximately two-thirds of a mile, the troops deployed in an open clearing where some of them foraged in a wheat field.
Extending his line for more than 1,000 yards to the west, Burgoyne occupied the southern slope of the rise of ground just north of the Middle Ravine. On the right, under the Earl of Balcarres, was stationed the British Light Infantry and the British 24th regiment, both under the command of General Fraser. In the center was Riedesel with his German contingent and batteries of two 12-pounders and two 6-pounders under Major Williams and Captain Pausch. On the left was stationed Major Acland in command of the British Grenadiers with the greater portion of the artillery. Though the larger part of Burgoyne's front was open, both his flanks rested in woods and were thus exposed to a surprise attack. Investigating the news of the British advance, James Wilkinson, Adjutant General to Gates, found their position favorable to attack and so reported to headquarters, whereupon Gates replied: "Order on Morgan to begin the game."
The American plan of attack was simple and direct. As Morgan undertook a flanking movement against the Light Infantry on the British right in that portion of the field farthest removed from the river, Poor was to move against the Grenadiers on the British left. Once these two movements had developed, Learned was to strike the German contingent which made up the British center. The American attack opened about 2:30 in the afternoon with Poor's savage assault upon the British left. Outnumbered two to one, the Grenadiers crumpled under the withering fire of the Americans. By this time Morgan had struck the British right. The British Light Infantry was driven back in confusion, and the right flank and rear of the troops led by Balcarres were now seriously threatened.
At this critical stage, General Fraser rode back and forth among his men in a desperate effort to encourage them to make a stand and cover the developing British retreat. In spite of all that he could do, his troops continued to withdraw under the deadly fire of Morgan's corps. In the confusion of attack and retreat, General Fraser was shot, perhaps by a member of a party detailed for that purpose by Colonel Morgan. Mortally wounded, he was carried from the field.
Before the enemy's flanks could be rallied, Arnold dashed impetuously onto the field and led Learned's brigade in an attack against the Germans, who comprised Burgoyne's center. Although without command because of a quarrel with Gates after the battle of September 19, Arnold now threw himself into the battle. By his powerful personality and reckless daring he inspired the troops to redoubled effort. Though the Germans repulsed the first attack, they were soon driven into retreat, for the withdrawal of Fraser's troops and the British Grenadiers had exposed them on both flanks.
When the 2,000-strong Albany County militia, commanded by Brig. Gen. Abraham Ten Broeck, came up to join the fighting, the British forces, discouraged by the loss of Fraser and the turn of events, retreated to the protection of their fortified positions. Within less than an hour after the opening of the attack, Burgoyne had lost 8 cannon and more than 400 officers and men, killed, wounded, or prisoners. Flushed with victory, part of the American forces were led by Arnold in a savage and costly attack on the Balcarres Redoubt, a position of great strength which lay on the Freeman Farm.
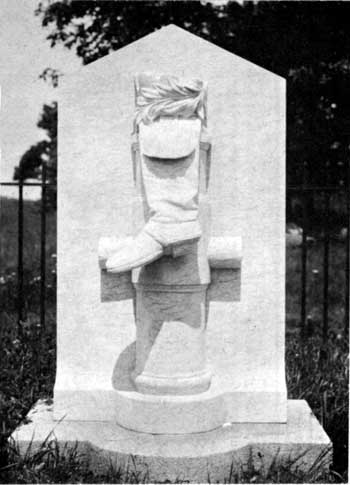
Unique monument to Arnold's left leg which was
wounded in the storming of the Breymann Redoubt in the battle of
October 7.
When repeated attacks failed to carry this position, into which the remnants of Burgoyne's flanking column had retreated, Arnold wheeled his horse and, dashing between the crossfire from both armies, rode northward in the direction of the Breymann Redoubt. In front of this work were American units that had circled farther to the north after the retreat of the British flanking column and had taken no part in the attack on the Balcarres Redoubt. Between the Balcarres and Breymann Redoubts stood two log cabins, held by Canadian troops. The attack on Breymann's position was being delayed until these cabins could be overcome. At about the time that Arnold arrived at the Breymann Redoubt, an attack was launched against the front and left of the fortification. Arnold joined the men attacking the left and rear. The combined attacks rapidly drove the defending German troops from the redoubt. Only darkness saved Burgoyne from a general retreat. As Arnold entered the rear of the redoubt, just as the work fell, he was shot in the leg by a German soldier. Had he died there, posterity would have known few names brighter than that of Benedict Arnold. The fall of this redoubt, which covered the right and rear of Burgoyne's fortified camp, forced him to order a general retreat. Colonel Breymann was killed in the assault on the redoubt that bears his name.
That night Burgoyne withdrew his army to the high ground north of the Great Ravine. Fraser's life slowly ebbed away throughout the night, and on the evening of October 8 he was buried in the Great Redoubt, in accordance with his own request. The retreat of the army northward was held up by Burgoyne long enough to administer the last rites in an impressive ceremony as Fraser's body was lowered into the ground. Shots from American gunners, who did not understand what was taking place, struck close and threw dust on the officiating chaplain. Early in the morning of October 9, the British Army took up its retreat to Saratoga. The British had suffered approximately 1,000 casualties in the fighting of the past 3 weeks as compared to an American loss of less than half that number.
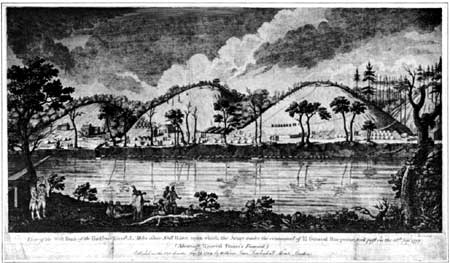
This print, published in London in 1789,
presumably shows the British position at the Great Redoubt. According
to the inscription accompanying the original print, it also portrays a
scene during Fraser's funeral. The original inscription seems to
contain certain inconsistencies.
Courtesy Life
Magazine.

|

| History | Links to the Past | National Park Service | Search | Contact |
|
Last Modified: Mon, Dec 2 2002 10:00:00 am PDT |