- Duration:
- 12 minutes, 20 seconds
The Challenges of Treating Delaminating Slate Headstones: New Treatments with New Materials by Irving Slavid

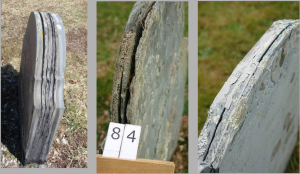
These examples on the left are 3 different kinds of opening up. There's a picture there of an old epoxy in the top, failing. Water's going to get in there. Snow's going to get in there. Ice is going to get in there. Over the course of time, they're going to pop apart, like the one on the right. I think someone mentioned about the heat on the stones is going to cause them to move.
Historically, the one on the left, has a wonderful lead cap put onto it. It's actually a sandstone, which has delaminated. The ones on the right were in the same cemetery that Martha was just showing you. Unfortunately, they drilled holes right through the stone to keep that copper cap on. It did hold the stone together and I understand squirrels love to eat lead. The one on the left is lead capped. These things are slowly disappearing.
The price of copper is causing these copper pieces to disappear. Then you've got this type of work set into either concrete or granite. It's kept the stone there. Historically, it's there. Aesthetically, it's a problem, but the stone is there. It's going to stay there for 1500 years. I think you saw one of these pictures up in Provincetown. There's actually 10 of these slates set into granite. Probably done 50, 70 years ago. Somebody asked me why or how that happened. Did they all break? Most of the stones, as I said, there's nearly 500 stones in that Winthrop Street Cemetery in Provincetown, probably 70% to 80% are slate.

Only this group, there's 6 pictured here, but there's 10 in the group, are in the granite. They couldn't have all broken off at ground. I don't know why they're put in there, but they're put in there. They're going to be in there. They're going to last, pretty much, forever. More than anything else we could do. Aesthetically, it's ... Today, it would also be very costly.
I'd come across some old patches, they're not mine, on the left-hand side there's some kind of epoxy mix that has been there; they've been there for maybe 20 years and they've worked. They're usually on very thick slates, which are not moving too much. Maybe they've moved and they've stopped. The picture on the right had an epoxy fill to it, which had failed and this is what you get. Eventually, these things are going to completely come apart and be delaminated.
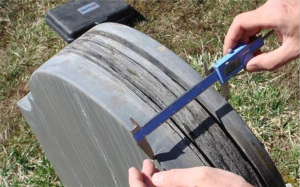
Quite a while ago, we started monitoring ... I had this one big, thick slate with many big delaminations that you can see, which I could monitor the movement on it. On the left-hand side is a digital laser thermometer, which I could record the temperature of the side of the stone in the sun, the side in the shade, the difference in the temperature, and I would monitor how much it moved.
If you look carefully, well don't look carefully, there's little scribe marks on the slate, so I knew where to put the micrometer every day to measure the same distance. It moved. When you have something moving and we want to fill the inside of it with a cementitious material which does not move, you got a problem. We could put it in the granite. We started experimenting with different fills. One of the problems with the cement that we ran into was we found a wonderful product about 12 years ago and then it was taken off the market. It was a flexible epoxy, but expoxies have got their problems.
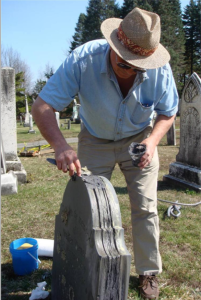
Here I am, it was in 2008 and I'd been applying 2 types of fillers; the cementitious one, basically a lime cement mix and a, I want to call, a hardware latex caulk mix, which I pigmented. I'm putting in a backer rod. A backer rod is a flexible, plasticy ... It comes in different diameters, to put the fill against. It doesn't stick to it. The caulk doesn't stick to it. The cement doesn't stick to it. It can be removed if you want to remove it or you leave it in place, but you can pack your caulking in your cement mix up against it.

There on the right-hand side, I've filled different voids with either cementitious mix or a pigmented latex caulk. Now, oh yeah, you can see it. Great. It's really big. I'm going to go over here. 4 months after ... How do put this ... It must be up here. How do you put the laser on? I see it, this button. Okay. Cementitious fill is all coming apart here. This gap from here to there has opened up even more and is now coming apart. Where down below here, with this gray latex, there's nothing coming apart and that was 4 months afterwards. Now a year later, we've got some big gaps in the cementitious. This is what we've been using all along. Epoxy, we tend to stay away from.
In the bottom image a year later, still tight and looking pretty good. These are blown up quite a bit. As we've heard earlier, there's no one solution for this problem. There are many, many solutions and maybe they're not the right solutions. We don't know yet for long term. We've got different kinds of breaks here just eroding on the side. It's all opened up on the side. One big giant break. A very, very thin break. There's a stone that's completely delaminated. That's what's going to happen to all of them unless they're looked after.
Ah, good. Basically, there's more than 3 ways to do it, but I'm going to show you 3 different ways that we've been doing it and monitoring all along. As the title says, I can apply a filler without filling the void. I just go all around the edge, fill it with either the cementitious fill or the caulk and put a backer rod in first, and then I'm filling it, cleaning up the edges. I usually leave down at the bottom, some weep holes just in case water does get in the top, it can get out.
Then you can fill the interior void, which I prefer to do. If someone's going to ask me when do you decide what to do and which stone, I don't have a good answer for that. It's a gut feeling of how big the void is and what's happening. We've gone along ... This is a pourable grout. It's a hydraulic lime grout. It's a very weak strength. It's a fluid one, it actually likes to pour. Hopefully I can show you that. Here I've either got a backer rod all around the edge or sometimes I fill it first to the edges and then I can pour, but I have to contain this liquid.
There I am pouring. If this movie works next, I'll show you. This stuff likes to flow. It likes to move. I've put in quarts or gallons of this material. Oh, wrong way ... Ah, it does work. It just likes to move. It likes to flow down. This is actually a brown sandstone, but I had a better movie than the one I did for the slate. You see it coming out, looks ... Darn, sorry. It won't work again. Okay, this one. You see it coming out here. It's just flowing, flowing, flowing, and going down this crack. It's going all the way down to the bottom of this stone, which is about 3 feet tall. If it leaks out, there's a backer rod. That's what it looks like, plastic. Sometimes I like to see it leak out of the bottom. I know it's gone all the way, and then I can fill it up.

This goes on for about a half an hour ... Okay. Good. This is a stone I was working on last year. You can see the epoxy fill up here. It was done, I don't know how long ago. I'm guessing 15, 20 years ago, I don't know. Epoxy has only been around more than 30 something years. Here I'm taking it off slowly. I've opened it up completely. Now here, I've started patching it, but left it open so I can pour my grout in.
Incidentally, I do all this work on-site. Again, the highest points on this stone are here and on top of this curve, so I'll pour into here and then when that's filled, I'll cap it and then go up on top and pour into here.
In the beginning, we just used a latex caulk you would find in the hardware store and then we finally went to a more professional grade caulk. This is made by Sto. They make products for fixing bridges and highways and buildings. It's not a commercial, it's more of a professional grade crack fill. Before you add the name down and are eager to buy it, the other hardware store caulk costs between $4 and $7. You're looking at $40 to $60 for 1 tube, but it works. It works very well.
Here I am mixing some pigments in it; it comes out gray and I'm mixing it in to get a different kind of color. Cleans up with water. It's actually relatively easy to work with. There I am tooling it on the right. There's pictures of the backer rod, which are behind that. If it's a wide gap, you put a backer rod in. Tooling it, fixing it up, and filling it up with water. If you pigmented it properly, it looks pretty good. Actually, it's pretty hard to see. Okay, here's a good one; 2008. 4 years later, this wide piece that was filled with latex was certainly too big for that latex to fill. It's starting to tear in the middle. Okay, so I'm now discovering if it's that big, put in the cementitious fill.
Over here is the detail of the Sto product and here it is down here. See that area? Kind of muddy. Looks different. This is blown up tremendously. I think there's a little area up here I filled. Basically, the casual passerby, you don't see it. I've got some series of before ... 4 years later of all pigmented ... This is in the same cemetery that Martha mentioned, the cemetery in Amherst mass. Other ones ... I'm obviously showing you the better ones. Actually, it's surprising, they look pretty good. It's hard to take exact before and after photographs, but this one's pretty good. That curve is right here and you can see something here, but only because I'm pointing it out. We've been monitoring these.
I'm not saying this is the end-all be-all, but it seems to be the way to be going; with something that moves with the slate, otherwise it's going to open up and we get the same problem. That's it, see? Good.
Last updated: April 7, 2025
